In modern digital marketing, tracking website traffic isn’t just about counting page views. Google’s search ecosystem and advertising frameworks rely heavily on machine learning. To feed these algorithms the right signals, your website must gather precise, event-based behavioral data.
Google Analytics 4 (GA4) is built entirely on this event-based model. Unlike the older Universal Analytics, GA4 tracks every user action—whether a click, a scroll, or a purchase—as an independent event. If your setup is broken or loosely configured, you are training your marketing tools with bad data, directly hurting your ability to optimize for search visibility or ad performance.
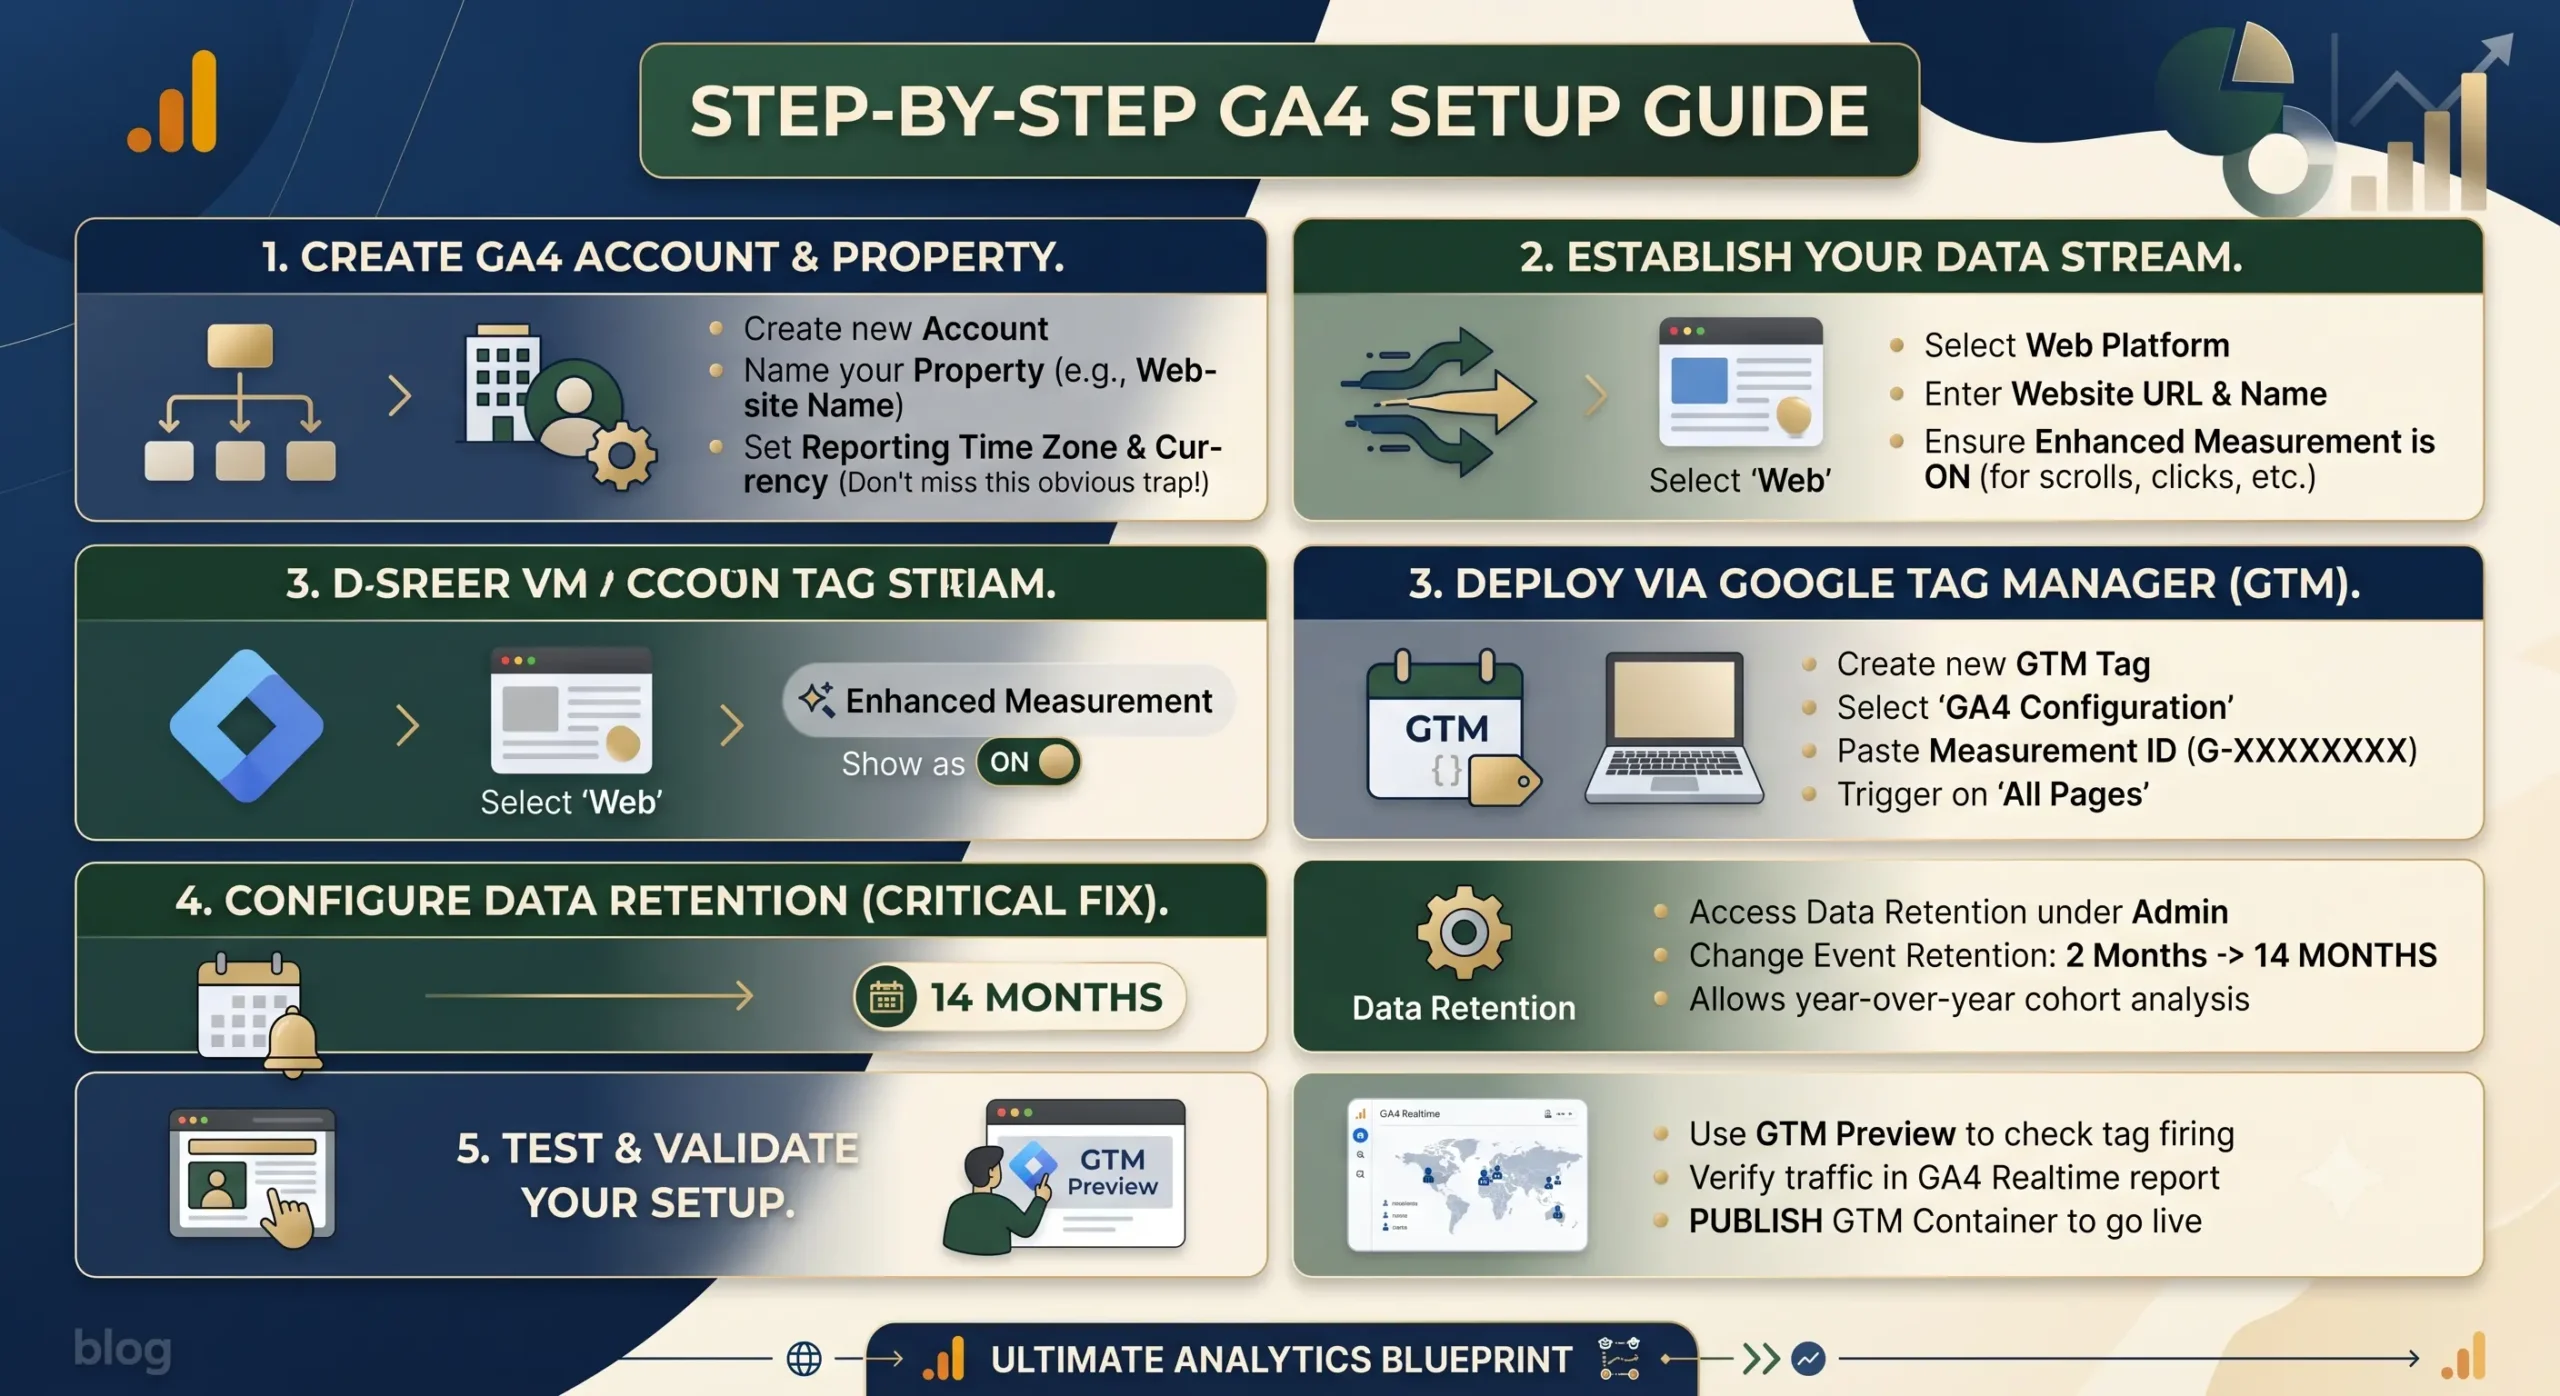
Many generic guides tell you to simply “create a property and paste the code.” However, a truly optimized analytics setup requires avoiding hidden technical traps. This step-by-step blueprint will guide you through a clean, future-proof GA4 installation from the ground up.
Step 1: Create Your Google Analytics 4 Account and Property
Before tracking any data, you must establish the structural container for your website inside the Google Analytics platform.
Execution Steps:
- Go to the Google Analytics Homepage and log in with your Google account.
- Click the Admin gear icon in the bottom-left corner of the dashboard.
- In the Account column, click the blue Create Account button. Enter your company name and configure your data-sharing preferences.
- In the Property column, click Create Property.
- Enter a clear, descriptive property name (e.g.,
MyBusiness_Website_Main). - Set your reporting time zone and billing currency accurately. The Obvious Trap Everyone Skips: If your reporting time zone doesn’t match your website’s primary audience or your Google Ads account, your daily data charts will mismatch, making multi-channel performance validation a nightmare.
- Click Next, fill out your business details, and click Create.
Step 2: Establish Your Data Stream
A data stream is the literal pipeline connecting your live website to your GA4 property container.
Execution Steps:
- After creating your property, GA4 will prompt you to “Choose a platform.” Select Web.
- Enter your website’s URL (e.g.,
mywebsite.com) and give the stream a name likeWeb Data Stream. - Leave Enhanced Measurement turned ON. This is a powerful feature that automatically tracks scrolls, outbound clicks, site search, and file downloads without requiring custom code modification.
- Click Create stream.
GA4 will now display your Measurement ID (formatted as G-XXXXXXXXXX). Copy this ID; you will need it for deployment.
Step 3: Deploy GA4 Using Google Tag Manager (GTM)
While you can hardcode the global tracking script directly into your website’s header (<head>), using Google Tag Manager is the industry gold standard. It keeps your code clean, avoids template bloat, and makes it incredibly easy to manage advanced event tracking later.
Execution Steps:
- Log into your Google Tag Manager Dashboard.
- Click Tags on the left menu, then click New.
- Name your tag clearly, such as
GA4 - Global Base Tag. - Click Tag Configuration and select Google Analytics > Google Tag.
- In the Tag ID field, paste the Measurement ID (
G-code) you copied in Step 2. - Click Triggering and select Initialization – All Pages (or All Pages). Using Initialization ensures Analytics loads before other non-essential marketing tracking scripts, capturing cleaner data.
- Click Save.
Step 4: Configure Data Retention (The Hidden Step Most Overlook)
By default, Google sets GA4’s user and event data retention period to 2 months. If you do not change this, your custom audience exploration reports will lose historical user data older than 60 days, leaving you unable to perform year-over-year cohort analyses.
The Fix:
- Return to your GA4 Admin panel.
- Under the Data collection and modification menu, click on Data retention.
- Change the Event data retention setting from 2 months to 14 months.
- Click Save.
Step 5: Test and Validate Your Setup in Real-Time
Never assume your tracking works simply because you hit save. You must validate the live technical deployment before calling it a day.
Execution Steps:
- Inside your Google Tag Manager dashboard, click the Preview button in the top right.
- Enter your live website URL and click Connect. This launches Google Tag Assistant in a simulated browser window.
- Browse around your live site, click a few elements, and view a couple of pages.
- Return to the Tag Assistant tab and confirm that your
GA4 - Global Base Tagsuccessfully shifted from the Tags Not Fired block into the Tags Fired block. - Next, open your live GA4 dashboard, go to Reports, and click Realtime. You should explicitly see yourself actively tracking as a live visitor on the real-time map.
- Once validated, return to GTM and click Submit and Publish to make your container live for all visitors.
Technical GA4 Setup Checklist
| Setup Focus | Core Action Item | Priority Level |
| Timezone Alignment | Match GA4 property reporting time zone to your ad accounts. | High |
| Enhanced Measurement | Keep active to natively map scrolls, clicks, and downloads. | Critical |
| Deployment Standard | Use GTM over hardcoded script layers to keep code clean. | High |
| Data Retention | Manually adjust data retention from 2 months to 14 months. | Critical |
| Live Verification | Inspect the GA4 Realtime dashboard before final publishing. | Critical |
Summary
Setting up Google Analytics 4 requires transitioning from loose, default parameters to an intentional, accurate data infrastructure. By building a clean property structure, routing data via Google Tag Manager, adjusting the hidden data retention trap, and verifying real-time tracking signals, you anchor your digital presence with absolute precision. For further advanced documentation on custom events, review the official Google Search Central Blog or access deep setup diagnostics via Google Analytics Support.